


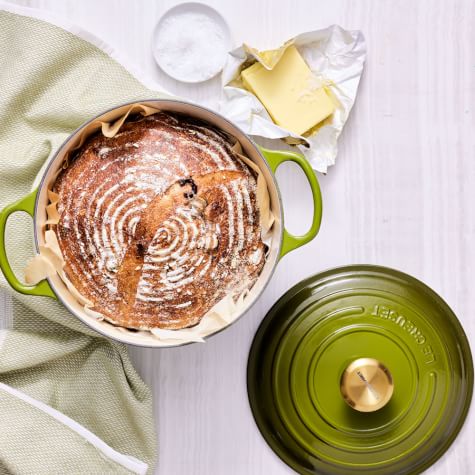
Olive Sourdough Loaf
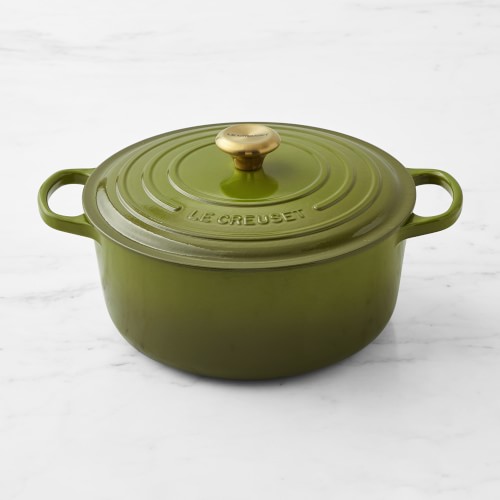
The Mill is one of our favorite bakeries in San Francisco for classic sourdough. Walk inside and you’re greeted by the sounds of coffee being made, and best of all, the wonderful aromas of sourdough bread, fresh out of the oven. Depending on the day, the bakers offer loaves with a twist—which inspired our recipe here. We add a mix of olives to give the loaf depth of flavor and a salty tang, then bake it in a cast-iron Dutch oven; this cooking vessel provides steady, even heat and traps steam inside, helping the bread to rise beautifully. This is a great bread to serve with salads, soups and pasta, or simply toast it and slather with butter. We’ve included instructions for making your own starter, but to save time, you can purchase one from a local bakery.
Note: The recipe quantities are listed by weight instead of volume because it’s a much more accurate (and faster) way to measure ingredients for baking. So set aside those measuring cups and spoons and pull out a scale. If you don’t own a scale, now’s the time to buy one—we think it’s an essential tool for any home kitchen.

Ingredients:
For the starter:
- 50 g all-purpose flour
- 50 g rye flour
- 100 g room-temperature filtered water (if the room is cold, heat the water to about 80°F/27°C before using)
Daily feed recipe:
- 20 g sourdough starter
- 50 g all-purpose flour
- 50 g stone-ground whole wheat or rye flour (this adds extra nutrients to the starter, which will boost the starter’s activity as well as acidity)
- 100 g room-temperature filtered water (if the room is cold, heat the water to about 80°F/27°C before using)
For the bread:
- 627 g bread flour, plus more for dusting
- 36 g all-purpose flour
- 36 g rye flour
- 524 g warm filtered water (90° to 110°F/32° to 43°C)
- 14 g fine sea salt
- 140 g leaven (mature sourdough starter)
- 115 g pitted olives (mixture of black and green), finely chopped
Directions:
Make the starter (1 to 2 weeks before making bread)
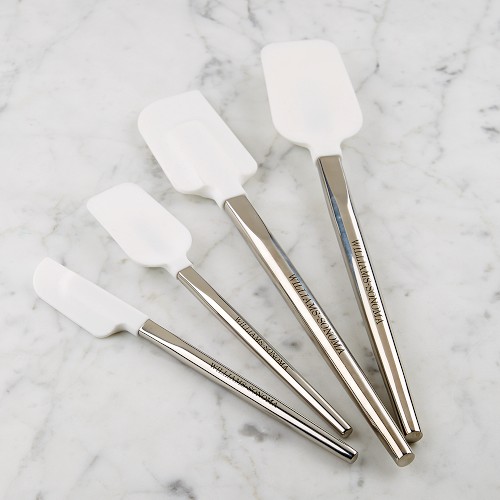
In a quart-size glass jar, bowl or other container, combine the all-purpose flour, rye flour and water. Using a small rubber spatula or spoon, mix until no dry bits remain and the mixture resembles thick pancake batter. Cover the top of the container loosely with a lid, kitchen towel or plastic wrap to prevent the batter from drying out but still allowing it to breathe. You can put a rubber band around the jar to mark the starter’s height, so you can see how much it has risen. Let stand at room temperature until the mixture begins to bubble, puff and lighten in color, 2 to 3 days. These are all signs of wild yeast activity, which will ultimately become the leaven and add the classic sourdough flavor characteristics to your bread.
Feed your starter
When your starter begins to show wild yeast activity, begin feeding it regularly at the same time each day. If you feed the starter predictably, it will act predictably, which is what you want when making sourdough. Choose a time that works for your schedule. Make sure that the amount of water and flour you add to the starter is the same in total grams; this is what makes your starter 100% hydrated.
A feeding means you are adding flour and water to a portion of the starter, which hosts wild yeast. The flour and water give the wild yeast nutrients to thrive. You will discard a large percentage of it each time, but you can add that to other batters to enhance their flavor.
When the starter falls by about 1/2 inch (12 mm)—you will see the markings on the glass container—this is an indication that it’s time to feed it again. Feeding times will vary depending on your room’s temperature. For example, if it’s hot outside, you may need to feed it twice in one day.
Once your starter begins to act predictably, doubling in size with bubbles and a sour smell and then falling by 1/2 inch (12 mm), it’s ready to use for bread making. This typically occurs after 5 to 7 days of consistent feeding.
Plan before you bake
Eight to 12 hours before baking, feed your starter to get it ready for making the dough. Depending on your feeding schedule, you may need to feed it twice in one day, which is fine. The point is to have your starter in a “mature” stage when you make the dough, i.e., bubbled, lightly doming on top and sour smelling. (This step is called “making the leaven.”) We recommend doing this in the morning or at night before bed.
To test if the leaven is mature, gently add about 1 Tbs. of it to a glass of water. If it floats, it’s mature and ready to rise your bread.
Make the bread
Step 1: Dough hydration (autolyse)
In a large bowl, whisk together the bread flour, all-purpose flour and rye flour. Pour in 514 g of the warm water and, using a rubber spatula, mix together until no dry bits remain. The dough will look messy and ragged. Cover loosely with a kitchen towel or plastic wrap and let stand at room temperature for 1 hour.
Step 2: Mix the dough
Uncover the bowl. Using your hands, gently pinch in the salt, leaven (your mature starter) and the remaining 10 g warm water until combined. This may be a bit messy. Pull the bottom of the dough out from underneath and then fold it over on top of itself. Transfer to a clean large bowl. Cover loosely with a kitchen towel or plastic wrap and set in a spot that’s 75°F to 80°F (24°C to 27°C), ideally in a warm, sunny spot or in a turned-off oven with the light on. If it’s colder, it may take longer to rise. Let the dough rest for 30 minutes.
Step 3: Folds and bulk fermentation
After the dough has rested for 30 minutes, lightly dip your hand in water (this helps with handling the dough) and dramatically pull one underside quadrant of the dough up and over the top of the dough to help build the dough’s gluten strength. Repeat for each quadrant. Re-cover the dough and let it rest in a warm spot. Repeat this process every 30 minutes, 4 to 6 more times (2 to 3 hours total), until the dough looks 30% to 50% larger in volume and jiggles, with a slight doming and some visible air bubbles. NOTE: After the second fold, gently mix in the olives by pinching them into the dough and gently kneading.
Step 4: Bench pre-shape and rest
When the dough is ready, gently transfer it to a work surface and lightly dust the dough with bread flour. Using a bench scraper, gently flip the dough over so the floured side is facing down. Lightly dip your hand in water and pull one of the bottom four quadrants up and over the dough, sealing it in the middle top of the dough round. Repeat for each of the remaining quadrants.
Flip the dough over so it is seam side down and cover with a kitchen towel. Let rest at room temperature for 30 minutes.
Step 5: Prepare the bread basket
While the dough is resting, generously flour a small round bread basket with bread flour (we use an 8-inch/20-cm basket), or line a medium bowl with a kitchen towel and generously flour the towel.
Step 6: Final shaping
Uncover the dough and lightly dust it again with bread flour. Using a bench scraper, gently flip the dough over so the floured side is facing down. Lightly dip your hand in water and pull one of the bottom four quadrants up and over the dough, sealing it in the middle of the dough round. Repeat for each of the remaining quadrants.
Flip the dough over so it is seam side down. Using your hands and using the surface as an anchor, pull the dough toward you to create a tightly rounded shape. Shift the dough and pull toward you again. This will help mold the dough into a smooth, tight round.
Step 7: Final proof
Using the bench scraper, gently flip the dough round over so it is seam side up and transfer to the floured bread basket or towel-lined bowl, keeping the seam side up. Cover with a kitchen towel or plastic wrap and let the dough rest in the same warm spot, ideally 75° to 80°F (24° to 27°C) for 2 to 4 hours. If it’s colder, it will be 5 to 6 hours; if warmer, 2 to 3 hours. You can also let the dough rest in its bowl in the refrigerator, with the dough wrapped with plastic wrap to prevent condensation, for 10 to 12 hours, which will help it develop more flavor. Bring to room temperature before baking.
To check if your dough is ready to bake, gently press it with your finger; it should slowly spring back and there should be a barely perceptible depression, but not much. If it quickly springs back, give it more time. If it leaves a depression, the dough may be overproofed.
Step 8: Score and bake
About 30 minutes before your bread is ready, place a lidded Dutch oven in a cold oven and preheat the oven to 500°F (260°C). When your oven is heated and the dough is ready, lightly dust the exposed side of the dough with bread flour. Line a small cutting board with parchment paper and place it, parchment side down, on your bread basket. Quickly flip the bread over onto the parchment.
Carefully but quickly remove the Dutch oven from the oven and remove the lid. Grab the corners of the parchment and transfer the dough, still on the parchment, to the pot. Using a sharp knife or blade, quickly score the top of the bread; we like scoring an “X” or a slash “/” with a slight curve to it, which will allow the bread to rise and expand. The Dutch oven will be hot, so take care during this step.
Replace the lid and return the pot to the oven. Reduce the oven temperature to 450°F (230°C) and bake for 20 minutes. Remove the lid and bake uncovered until the bread is dark golden, 20 to 25 minutes longer. To test for doneness, an instant-read thermometer inserted into the interior of the bread should register 190°F (88°C).
Transfer the bread from the Dutch oven to a cooling rack and test again for doneness by lightly tapping the bottom of your loaf—it should sound hollow. Let cool for at least 1 hour before serving. This is important for the bread baking, as the proteins will continue to cook as the loaf cools. Makes 1 loaf; serves 8 to 10.
Williams Sonoma Test Kitchen
Recommended Products
-
Sugg. Price $480 Clearance $383.99
 (7)
(7)
-
$159.95

-
$49.95
-
$12.95
-
$19.95
-
$150
 (149)
(149)