Read Reviews >
This bread is almost effortless to make because it requires no kneading. Instead, the dough is allowed to slowly rise over a long period of time. Then it is baked in a preheated covered bread pot or Dutch oven, which helps produce a crispy, bakery-style crust on the finished loaf.
Ingredients
- 3 cups (15 oz./475 g) all-purpose flour
- 1/4 tsp. instant yeast
- 1 3/4 tsp. salt
- 2 tsp. chopped fresh rosemary
- 2 tsp. chopped lemon zest
- Cornmeal as needed
Directions
In a large bowl, combine the flour, yeast, salt, rosemary and zest. Add 1 5/8 cups (13 fl. oz./410 ml) water and stir until blended; the dough will be shaggy and very sticky. Cover the bowl with plastic wrap. Let the dough rest at warm room temperature (about 70°F/21°C) until the surface is dotted with bubbles, 12 to 18 hours.
Place the dough on a lightly floured work surface. Sprinkle the dough with a little flour and fold the dough over onto itself once or twice. Cover loosely with plastic wrap and let rest for 15 minutes.
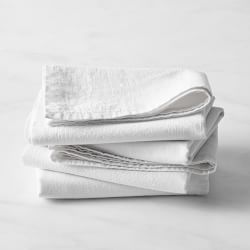
Using just enough flour to keep the dough from sticking to the work surface or your fingers, gently and quickly shape the dough into a ball. Generously coat a cotton towel, preferably a flour sack towel (not terry cloth), with cornmeal. Put the dough, seam side down, on the towel and dust with more flour or cornmeal. Cover with another cotton towel and let rise until the dough is more than double in size and does not readily spring back when poked with a finger, about 2 hours.
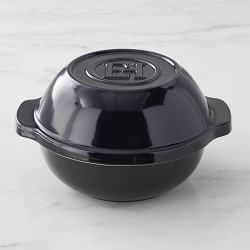
At least 30 minutes before the dough is ready, put a 2 3/4-quart (2.75 l) bread pot or Dutch oven in the oven and preheat the oven to 450°F (230°C).
Carefully remove the pot from the oven. Slide your hand under the towel and turn the dough over, seam side up, into the pot; it may look like a mess, but that's okay. Shake the pan once or twice if the dough is unevenly distributed; it will straighten out as it bakes. If desired, using a very sharp knife, cut three shallow parallel slits in the top of the dough. Cover with the lid and bake for 30 minutes. Uncover and continue baking until the loaf is browned, 15 to 30 minutes more.
Transfer the pot to a wire rack and let cool for 10 minutes. Using oven mitts, turn the pot on its side and gently turn the bread; it will release easily. Makes one 1 1/2-lb (750 g) loaf.
Adapted from Sullivan Street Bakery (New York City) and Mark Bittman, "The Secret of Great Bread: Let Time Do the Work," The New York Times, Nov. 8, 2006.
Rated 5 out of
5
by
Opprinellig from
No need to knead.
Just get the top end flour and water and let the yeast do the rest. Been baking simple breads for a while using the Dutch oven method and it does yield bakery level product. Never considered rosemary and lemon zest, but a great version that came out.
Date published: 2023-01-10
Rated 5 out of
5
by
EarlyBird from
Easiest bread ever!
Every time I make this loaf it turns out perfectly. I always prep the dough the night before I want to bake, so it has plenty of time to develop. And I love the bread pot for baking - creates a beautiful, round loaf with a crispy crust & chewy interior.
Date published: 2021-02-26
Rated 5 out of
5
by
Cggk75 from
I can bake bread!
Super easy, used parchment to line and get the dough in and out of the pot. Mine only needed 15 minutes to brown. It is fantastic, will never buy bread again.
Date published: 2021-02-14
Rated 5 out of
5
by
Rosie from
Great recipe!! Loved it!!
I used active dry yeast (1/4 tsp) I also used parchment paper instead of cotton towel to sit dough on. Once dough was ready to go into the pot, I just picked up parchment paper and placed it in the pot. I added slits in the dough before I put it in the pot. I will be making this recipe a lot. My family loved it!!
Date published: 2020-08-10
Rated 5 out of
5
by
MorgansMama from
Great flavor, some technical adjustments
Recipe yielded a beautiful, delicious, crusty loaf. The rosemary and lemon combo is lovely for bread. I thought the recipe had some technical shortcomings. First rise was nowhere near 12 hours in my kitchen. In NYC mid-Spring my kitchen was just 70° and the dough was fully risen and bubly in roughly 8 hours then 2nd rise took about 75 minutes. So this is definitely a dough you have to gauge. I subbed in active dry yeast at a 1:1.25 ratio. Also, the handling instructions here seem a bit clunky maneuvering with towels so I decided to simplify: After shaping I placed the dough on a piece of greased parchment paper seam side down and covered it with a floured fabric placemat. Once proofed I slit the dough BEFORE placing it in the pot and used the parchment to carry and drop into the hot Dutch oven. Not sure why the instructions say to slit after you've got the dough in the pot...why on Earth would anyone wield a knife inside their Dutch oven?? And why risk searing your hands and making a mess of the dough flipping with towels? The parchment allows you to safely place the dough in the pot as well as remove it once it's done! Last tip, I always put a hard-bottom pan filled with water on my oven floor to create a steam bath in order to produce a shiny, crackly crust.My dough was still quite blonde after 30 minutes so I left the lid on and let it go 10 more. After 40 minutes it was golden, I took the lid off and let it brown 15 minutes- perfection !
Date published: 2020-05-08
Rated 5 out of
5
by
OstrichV from
Good instructions. Turned out great.
The instructions were spot on, and the bread turned out with great crumb & crust. I'd consider the slits on the top of the bread required, not optional, so the bread can rise well, and have a pleasing shape. Those newer to baking bread might want to consider parchment (and cornmeal on top of the parchment) since the dough is so wet.
Date published: 2020-04-13
Rated 5 out of
5
by
Sarah H from
Perfect!
This was the first time I made bread in a Dutch oven, and this recipe was so easy! Smells wonderful. There were a couple of reviews arguing how instant yeast should have been used, but I had amazing results following the recipe with active dry. Make sure your yeast is still good, and if you have an open jar of it make sure to store it in the fridge and take out the portion you need. I had it come to room temperature for a few minutes before doing anything else. Will absolutely make this again!
Date published: 2020-04-12
Rated 5 out of
5
by
Alycia from
Perfect for first timers!
Definitely use the active dry yeast... NOT instant yeast. You simply mix everything together with warm water and leave it overnight (I do 13 hours). You will see the dough bubble up and double in size. It WILL be super gooey and messy, don’t skimp on flouring that towel! Even if a ton of it stick to the towel though, you will still get a great loaf (at least I did anyways). Slice and re-toast for AMAZING bread to go with your soups!!
Date published: 2020-04-12


